Earlier I bought a Shimano 3 position RevoShift indexed twist shift to match the existing 7 speed shifter for the rear dérailleur. And when I changed out my cables, I ordered enough extra cable housing so that when I added a shifter everything would match. But I still needed to work out several things in order to add a multiple gears (or chainrings) to the front crank (or pedals) and a dérailleur to shift them. Such as:
#1 was easy. The current cable to the rear dérailleur goes along (and through) the down tube. so having the front shift cable going the same way seems to be a no brainer! And on the bottom bracket there is a plastic guide that the rear cable goes through with a guide for the front shift cable. This also dictates that the front dérailleur needs to be a bottom pull versus a top pull design. But since I can't make the cable go through the tube, I'll have to use some guides to hold the cable in place.
But then there's the issue of how to mount the cable guide(s) and a cable stop. Using a clamp to hold the cable (like they did on vintage 10 speeds) is simple but just wouldn't look good. (And the downtube is large and oval, not round!) The factory brazes or welds these stops onto the frame- totally out of my capabilities and I would have to repaint the frame. What about using epoxy? That would work for the cable guides, but would it hold up for the cable stop?
- How and where to run the shift cable and mount it to the frame
- Crank set and chainrings (or chainwheel)- do I want 2 or 3 chainrings (Just because I have a 3 speed shifter doesn't mean I have to use 3 chainrings!)
- What kind of dérailleur to get and how to mount it
#1 was easy. The current cable to the rear dérailleur goes along (and through) the down tube. so having the front shift cable going the same way seems to be a no brainer! And on the bottom bracket there is a plastic guide that the rear cable goes through with a guide for the front shift cable. This also dictates that the front dérailleur needs to be a bottom pull versus a top pull design. But since I can't make the cable go through the tube, I'll have to use some guides to hold the cable in place.
But then there's the issue of how to mount the cable guide(s) and a cable stop. Using a clamp to hold the cable (like they did on vintage 10 speeds) is simple but just wouldn't look good. (And the downtube is large and oval, not round!) The factory brazes or welds these stops onto the frame- totally out of my capabilities and I would have to repaint the frame. What about using epoxy? That would work for the cable guides, but would it hold up for the cable stop?
|
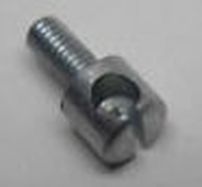
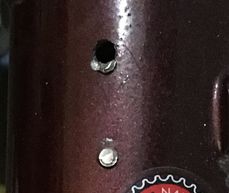
What about screwing in an old style stop like this on the left? I just drill and tap an appropriate size hole in the frame.
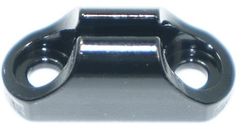
Then I came across these on the right. More modern design, available in silver or black. Ordered it in black, I can always repaint it in red later. And instead of just drill and tap the frame for the screw mounts, I came across RJ The Bike Guy's video where he uses rivnuts (or rivet nuts) to mount a water bottle bracket to a bike frame. But I could also use pop rivets to mount this cable stop. |
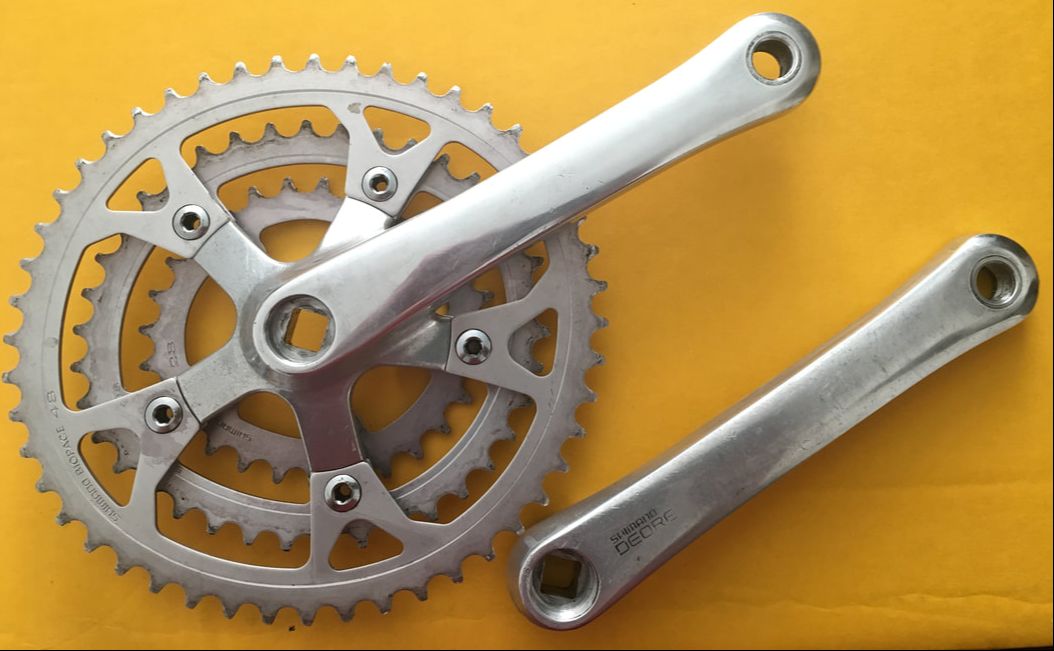
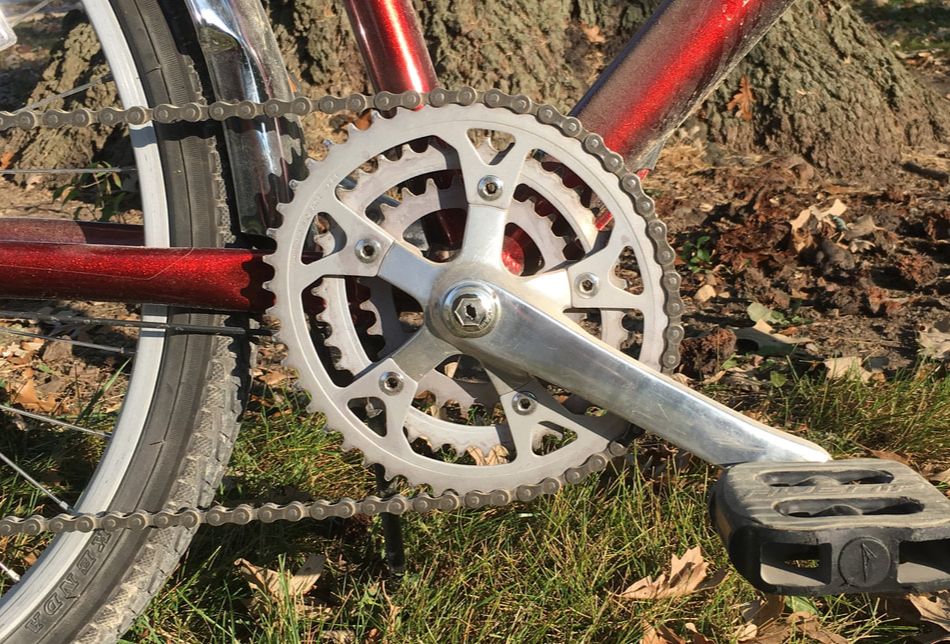
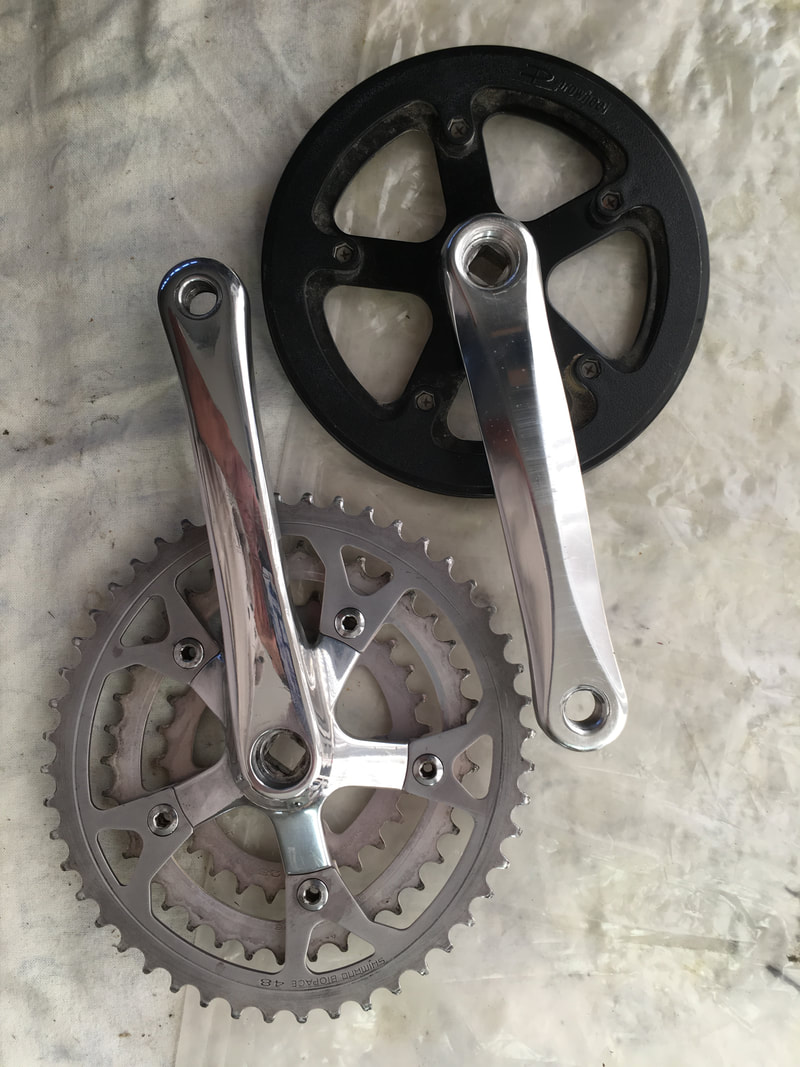
For #2 I needed to figure out what kind of crank set my bike had. Turns out to be a 3 piece crank using a standard square spindle. My crank arms were 170mm, so maybe I should stick with the same?
So the search started for square taper crankset. Some listings were for just the right arm where the chainring is, others had both arms. I would want the pair to match. Some crank arms came with 2 or 3 chainrings, others without. For simplicity I want a crankset- both arms and chainrings.
Do I want the chainings fixed (riveted) or removable? 4 or 5 spokes (or are they arms)? Let's have them removable in case I want to do further upgrades or replacements!
 click to enlarge
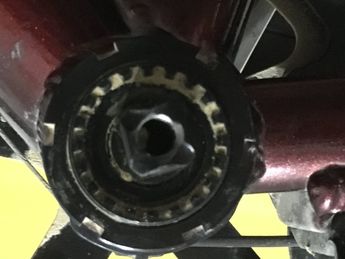
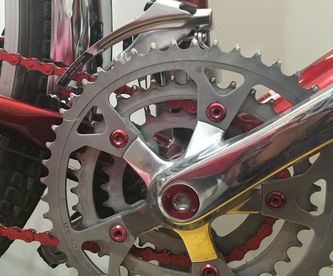
My current crank has a 40 tooth chainring. I need more teeth for a higher gear ratio and faster speed. I also want a smaller chainring with fewer teeth for easier pedaling up the hills. There are some crank sets with 2 chainrings such as: 52/38 or 48/32. The first would definitely give me more on the top end, but not so much on the low end.
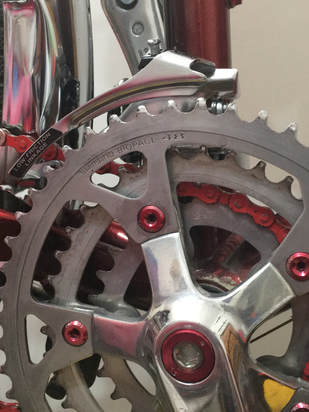
I finally decided on this used Shimano Deore 48/38/28 triple combination. The middle gear of 38 is pretty close to the 40 that I have with my current crank. And the others give me my desired increase on the top end along with a nice 'granny gear' (or should that be a 'grandpa gear' for me?) on the bottom end! And I didn't realize until it arrived that these Biopace chainrings are elliptical versus circular. From what I've read online, most say that the elliptical is better than the conventional rings and easier on the knees. So far on my rides I haven't notice a difference. But I'm definitely keeping them! Sheldon Brown (a super great website!) has a very in-depth article about the Biopace chainwheel, I read the article after getting this!
I finally decided on this used Shimano Deore 48/38/28 triple combination. The middle gear of 38 is pretty close to the 40 that I have with my current crank. And the others give me my desired increase on the top end along with a nice 'granny gear' (or should that be a 'grandpa gear' for me?) on the bottom end! And I didn't realize until it arrived that these Biopace chainrings are elliptical versus circular. From what I've read online, most say that the elliptical is better than the conventional rings and easier on the knees. So far on my rides I haven't notice a difference. But I'm definitely keeping them! Sheldon Brown (a super great website!) has a very in-depth article about the Biopace chainwheel, I read the article after getting this!
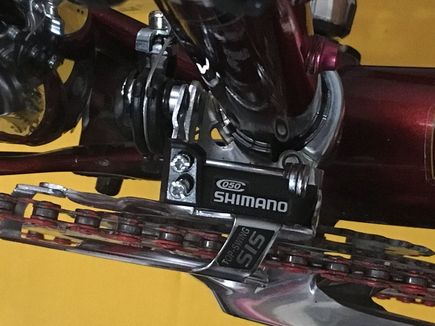
#3 seemed more daunting in my mind. So I decided to select my crank set first. The rear dérailleur is pretty standard, usually bolted to a hanger on the end of the frame. But the front can either clamp to the seat tube of the frame, or attach to a braze-on mount which my frame lacks. I was hesitant about clamping to the frame, worried that the paint might get scratched or chipped. There are braze-on adapters which clamp to the frame, but I prefer not to do that! Shimano has a style that mount direct to the bottom bracket, also referred to as an e-type mount. That seemed at first to be what I wanted. But many of the auction listings lacked details. One detail is the frame size the shift was designed for- there's usually a u-shaped part that goes against the seat tube to keep the unit from rotating if the bracket mount gets loose. Other details like chainstay angle- how do you calculate that! Starting to get too complicated for this novice.
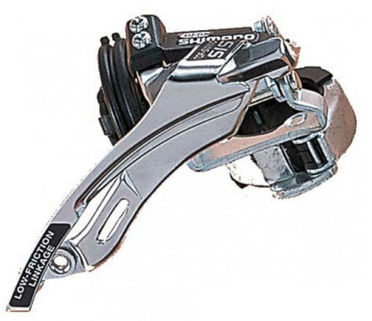
When I found this Shimano front dérailleur, it seemed to hit all the right marks. 48 tooth max chainring along with 20 tooth capacity means it should work with my chain set. And with a plastic 31.8mm adapter for the 34.9mm clamp should ease my concern about using a clamp since my frame needs the adapter! Dual pull means I can use it in my bottom pull configuration.
It's perfect! (I think!) But maybe I should have re-read Sheldon's Biopace article, especially his recommendation that "the front derailer must have about 4 teeth more chainring capacity than for round chainrings, and.. two teeth larger than the.. large Biopace chainring." So in retrospect, a shift with 50 tooth max with 24 tooth capacity may have been better.
Installation of the parts
I started first with installing the crankset. Installation was easy. I knew I needed a longer chain, but lucky for me the current chain is just barely long enough! It turns out that you can use a double or triple chainring without a dérailleur- you just can't shift while riding. If you need to change gears, stop the bike and manually move the chain onto the other ring. You can turn the crank backwards, and pull down and guide the chain from the bottom onto the desired ring. (That's how they did it in the early years!)
On my first ride on the Des Plaines River Trail, I planned on shifting down to the middle chainring at my turn around point. My ride was so good I left it in place. On a later longer ride, I finally had to move it to the middle gear for the last quarter of the ride.
I did learn one important point on my first ride: don't shift into the largest rear gear when using the largest chainring! My chain locked in place and I couldn't shift out! Had a bit of a struggle to manually move it out.
click to enlarge
I also noticed that the used crank was a bit dull, even on my dusty bike. Time to go to Dad's garage and use the buffing wheel! So nice and shiny now!
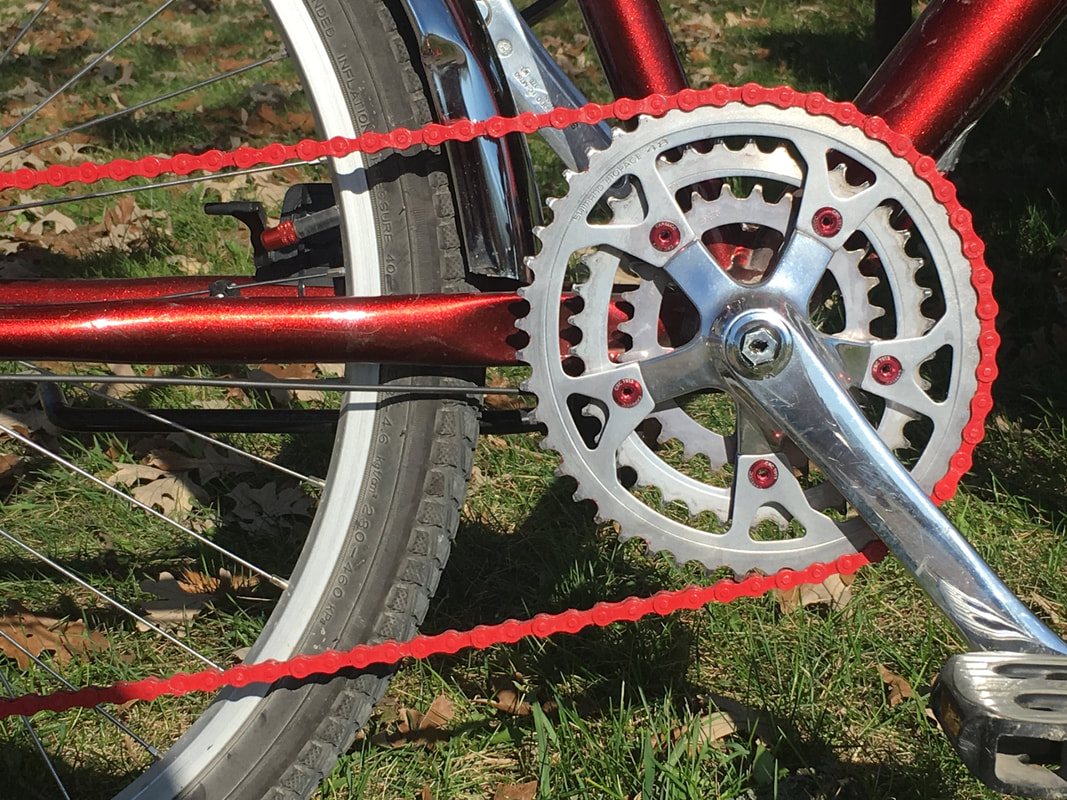
I bought a longer red chain and chainring bolts. No more shifting issues. 116 links, only needed to remove 1 link. New crank bolts are on the way to replace the cheap plastic covers. Later I reviewed the sizing guidelines and removed one more link.
I bought a longer red chain and chainring bolts. No more shifting issues. 116 links, only needed to remove 1 link. New crank bolts are on the way to replace the cheap plastic covers. Later I reviewed the sizing guidelines and removed one more link.
click to enlarge
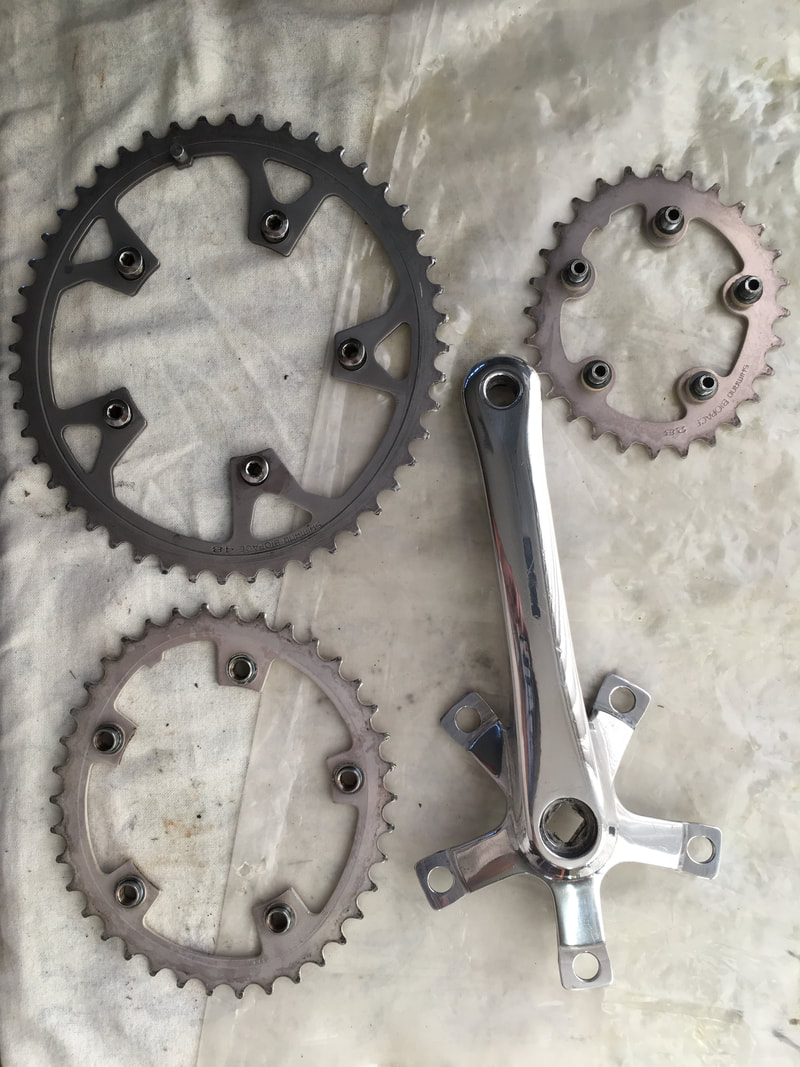
I took apart the crankset in order to polish the crank arms. Here are some pictures, and a comparison with the stock crank. The outer large chainring mounts on the outside of the crank. The middle ring uses a 1.25mm spacer. And the small innermost chainring uses 4.9mm spacers.
click to enlarge
|
click to enlarge
|
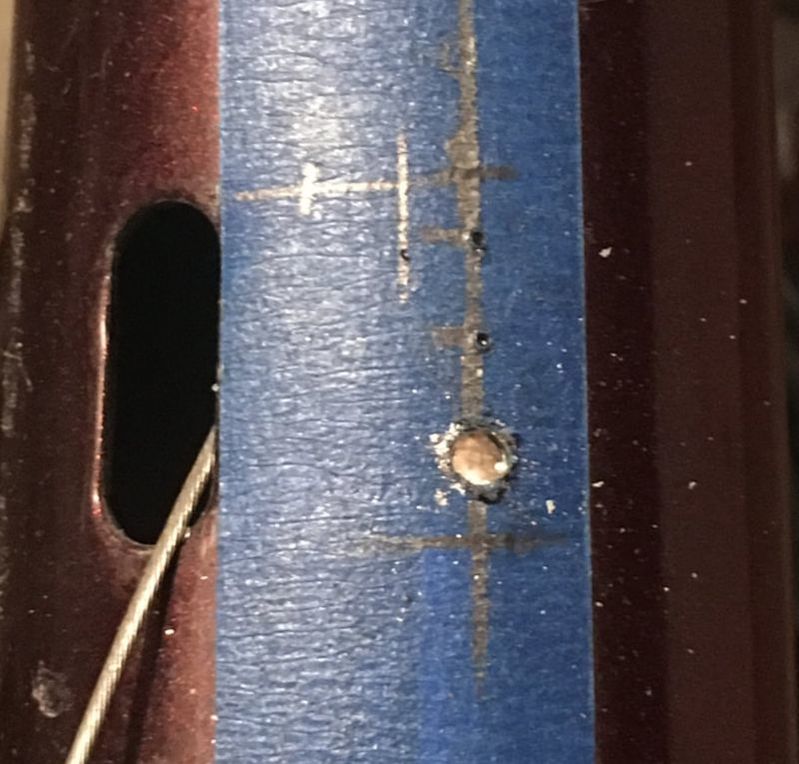
Now onto the second phase. The cable stop came in, but it was taller than I envisioned. And instead of using rivnuts or pop rivets, I ordered some self tapping M3 screws. Drilling the frame was easier than I expected. I applied masking tape to protect the frame, and marked out and punched where the stop should be. But unfortunately, a big fail. The self tapping screws broke off. Perhaps I should have bought an M3 tap instead? I hesitated on this since I didn't realize the frame was so easy to drill through.
Since I wasn't happy with the cable stop design, I decided to order the other older style stop. I ground down the one screw stub and will paint it. The other I drilled out for the replacement cable stop. While browsing to find the cable stop, I came across this following item.
Since I wasn't happy with the cable stop design, I decided to order the other older style stop. I ground down the one screw stub and will paint it. The other I drilled out for the replacement cable stop. While browsing to find the cable stop, I came across this following item.
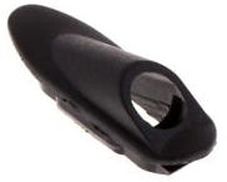
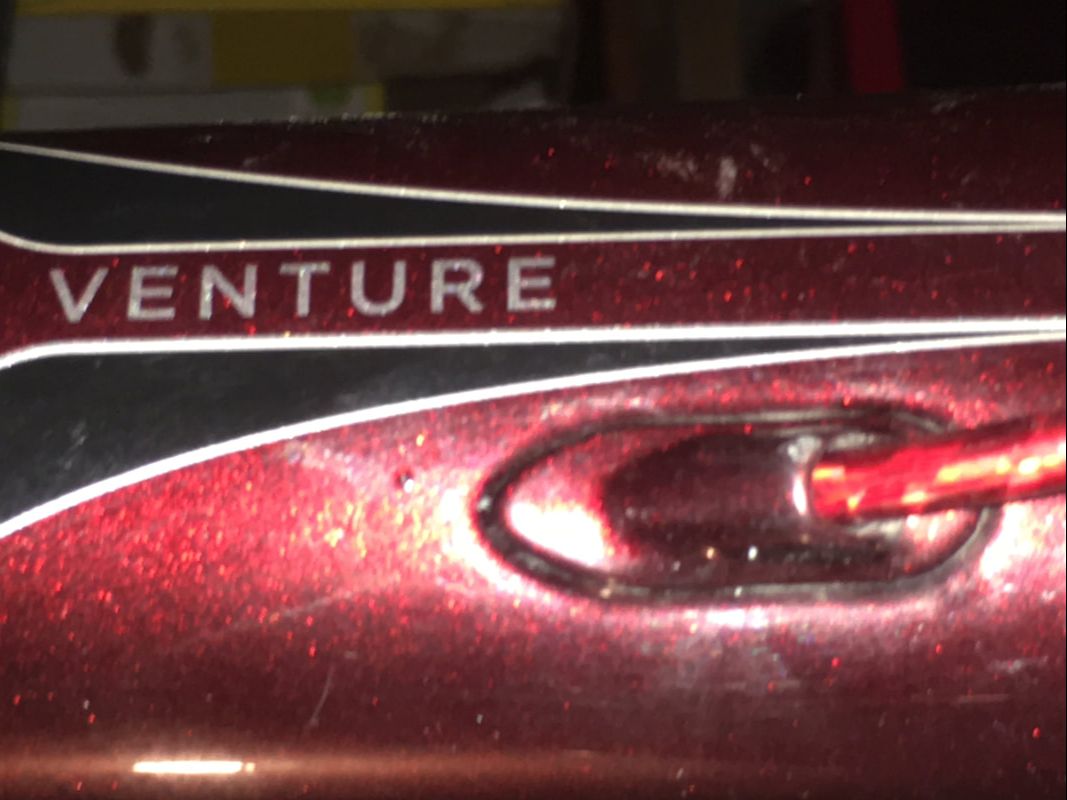
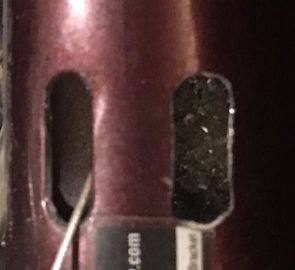
I didn't know these were available! They match what's already on my bike! The rear dérailleur cable goes through the tube, and now the front shift cable can do the same. No need to glue clips to the frame to hold the cable in place. Where the guide goes, I'll need to drill two holes at each end, and cut out in-between to make an oval. The cable goes through the guide and into the frame, and then the guide snaps in place. Repeat on the other end where the cable comes back out of the frame!
|

|
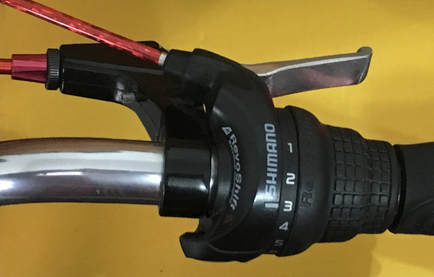
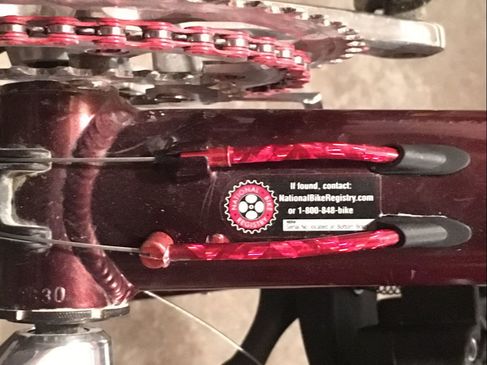
Up at the top I said that I got a RevoShift for the left side. I decided to replace the twist shifts with a trigger shift. Found a 7x3 shift set with integrated brake levers for a great price. I made sure that the brake levers were compatible with my v-brakes. Push the lower trigger with your thumb to shift down to a lower gear, pull the upper trigger with your finger to shift up.
Shimano Revoshift twist shifter
|
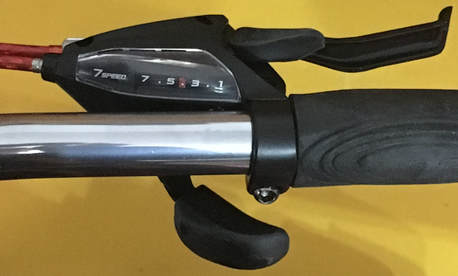
Shimano EZ-Fire Plus trigger shifter
|
|
And a final upgrade was to replace the standard Avenir (same brand as the saddle) handgrips with something more comfortable. When I was buying my new handlebar, I saw that my bike shop had a selection of Ergon grips. After a bit of research on Ergon's website, decided to get the GP1. They have a nice Grip Selector to help tailor the choices for Mountain, Touring, Urban and Fitness bikes!
Oops! I installed them backwards! Still nice and comfortable on my first ride! I'll swap them, very easy to install and remove. |

Ergon GP-1
|
Modifying the frame
|
Laying out the other side was a challenge. I used the graphic to help lay out the new guide.
Viewed from the bottom, the alignment looks pretty close. Since the original guide is painted, I painted the new one. Right now, the color is not an exact match. But I can always repaint when I find a better matching color. |
Now that all my parts are in, time to assemble. Borrowed my brother's bike stand to do this. First, drill out and cut the channel where the cable enters and leaves the frame.
I removed the original guide so that I could measure and layout the new guide in the same place. Started with small pilot holes then drilled larger and final size. Ground out the middle and finished with a file. 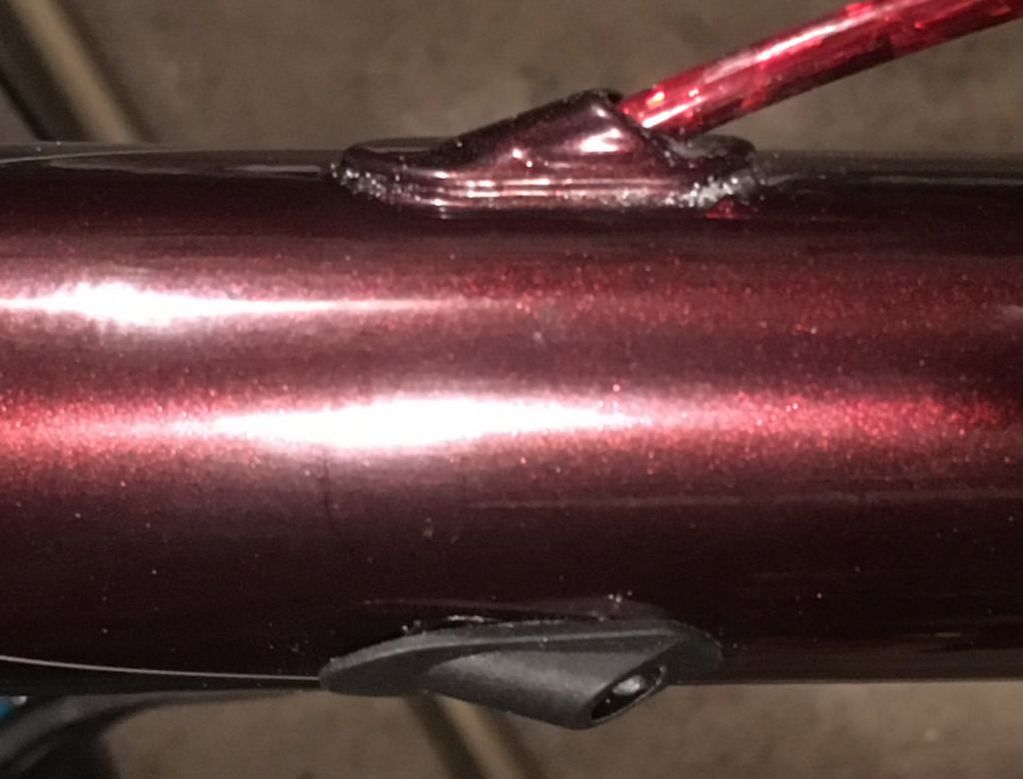
|
Install and adjust the derailer (or dérailleur!)
|
Here is the shifter finally installed. I added a piece of inner tube between the clamp and frame to protect the paint. I had to use pliers to squeeze the clamp together in order to get the clamp bolt to engage!
It took a lot of adjusting, but I finally got it done! There were a couple of issues that I had to overcome. The first was my fender interfering with the cage when it was on the innermost gear. With bit of adjusting (using some padding and an assortment of prying tools) I was able to move the lower edge of the fender in enough without rubbing the tire. You can see the clear gap between the fender and frame. |
|
 Large Gap Large Gap
The second issue was a more of a challenge! There was a sticker on the derailer cage showing the proper height to mount the cage above the chainwheel teeth, usually about 2mm or a penny thickness. But because of the eccentric gears, this height varied as the crank turned. Instead of finding the highest position of the gear, it was easier for me to keep moving the derailer up until everything was clear. I made sure that the cage was parallel with the chainwheels and fully tightened the clamp.Then it took a lot of adjusting back and forth of the limits, but I finally got it done. I can shift the front up and down no matter which rear gear is engaged. Sheldon Brown's website has a good article for doing this.
|
Small Gap
|
While adjusting the derailer, the chain fell off the smallest gear once. I ordered a small chain catcher to mount below the derailer to prevent this, since the paint can be damaged should this happen during a ride. And it fell off the largest gear once as well. I doubt this will happen again now that the derailer is properly adjusted.
Took it out for a short 5 mile test ride. Shifts are very good. I just need to remember to firmly press with my thumb to shift into the outermost large chainring.
Took it out for a short 5 mile test ride. Shifts are very good. I just need to remember to firmly press with my thumb to shift into the outermost large chainring.
